IPTV Network Settings: Router and Connection Guide for Australia
IPTV network Australia configuration is the layer beneath everything else in your setup—the router settings, DNS choices, VPN decisions, and Wi-Fi configurations that determine whether your streams run smoothly or buffer every ten minutes. This guide goes deeper than the basics and covers every network-level setting worth knowing for Australian IPTV users, including router-level optimisations, VPN setups, and port configurations.
IPTV network settings for users in Australia include the router and local network setups that impact how well IPTV streams work. This covers choosing DNS servers, setting Quality of Service (QoS) rules, picking between Wi-Fi bands (2.4 GHz or 5 GHz), setting up wired Ethernet connections, optionally using a VPN to avoid slowdowns from ISPs, and adjusting NAT/firewall settings that might block IPTV connections on some Australian NBN setups.
What You Need Before Starting
| Item | Required? | Notes |
|---|---|---|
| Router admin access | Yes | 192.168.0.1 or 192.168.1.1 — check your router label |
| Router admin password | Yes | On the router label if unchanged |
| IPTV device MAC addresses | Recommended | For static IP and QoS setup |
| Current ISP and plan details | Recommended | Affects which fixes apply |
| VPN subscription (optional) | No | Only needed if ISP throttling is confirmed |
Step 1 — Access Your Router Admin Panel
Everything in this guide starts here.
- Connect a computer or phone to your home network
- Open a browser and enter (most routers) or
192.168.1.1(some models — try both) - Enter your admin username and password (printed on your router label if you’ve never changed it)
- You’re in the router admin panel
Common router admin URLs by brand:
| Router Brand | Admin URL | Default User |
|---|---|---|
| Netgear | 192.168.1.1 | admin |
| TP-Link | 192.168.0.1 | admin |
| ASUS | 192.168.1.1 | admin |
| D-Link | 192.168.0.1 | admin |
| Telstra Gateway | 192.168.0.1 | admin |
| Optus Sagemcom | 192.168.0.1 | admin |
If something goes wrong: if you can’t reach the router admin page, your router may use a different address. On Windows, open Command Prompt, type the command, and look for “Default Gateway.” On Mac: System Preferences → Network → your connection → Router. That IP address is your router’s admin address, which is used to access the router’s settings.
Step 2 — Configure DNS for IPTV Performance
Your ISP’s default DNS servers are optimised for their own infrastructure, not IPTV performance. Switching to faster public DNS servers reduces stream initialisation times and can improve reliability.
At the router level (applies to all devices):
- In router admin → find Internet Settings or WAN Settings
- Look for DNS Server settings
- Change to:
- Primary DNS:
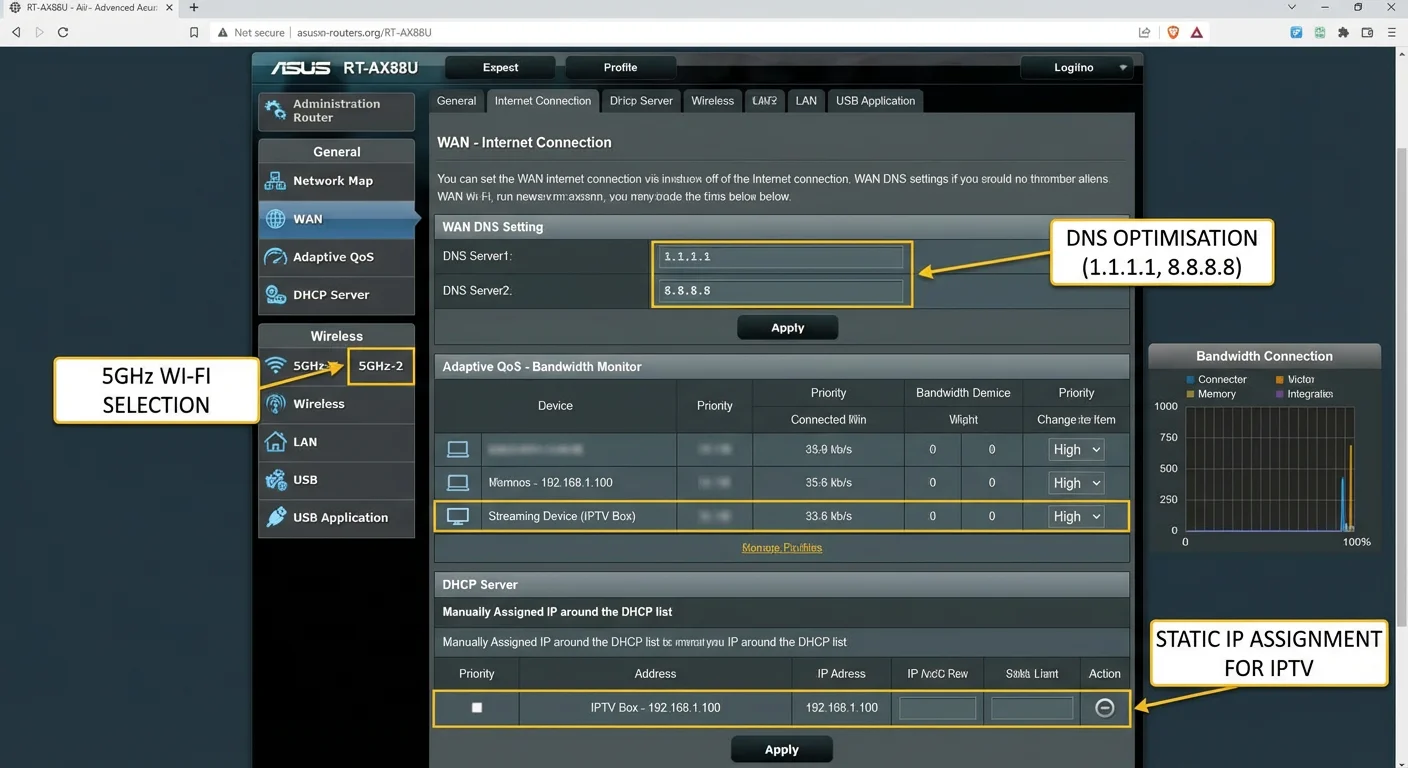
1.1.1.1(Cloudflare) - Secondary DNS:
8.8.8.8(Google)
- Primary DNS:
- Save and reboot the router
At the device level, this applies to only one device:
- On your IPTV device: Settings → Network → Wi-Fi → tap your network → Advanced or Static
- Change DNS to
1.1.1.1/8.8.8.8 - Save
Why: 1.1.1.1: Cloudflare’s DNS is consistently the fastest globally in Australian testing, with response times under 5 ms from major capital cities. Google’s 8.8.8.8 is a reliable backup.
Why it matters for IPTV: Every time you switch channels, your device does a DNS lookup to resolve the stream URL. Faster DNS = faster channel switching. On older default ISP DNS servers, this lookup alone can add 100–300 ms to every channel change.
If something goes wrong: if the internet stops working after changing DNS, the new DNS values have been entered incorrectly. Revert to “Automatic” or “ISP Default” DNS. Double-check the numbers: 1.1.1.1 and 8.8.8.8—no letters, no extra digits, and dots in the right places.
Step 3 — Set Up QoS (Quality of Service) for IPTV
QoS tells your router to prioritise IPTV traffic when your connection is under load—downloads, games, and video calls all compete with your IPTV streams. With QoS, IPTV wins.
Finding QoS on your router:
- TP-Link: Advanced → QoS
- Netgear: Advanced → Setup → QoS Setup
- ASUS: Adaptive QoS (excellent built-in implementation)
- Telstra Gateway: Limited QoS — may only allow basic device priority
Setting up QoS:
- Find your IPTV device’s MAC address (Settings → About → Status → Hardware Address on Fire TV / Android TV)
- In router QoS settings → add device by MAC address
- Set priority to: Highest or Real-Time (varies by router)
- Save
ASUS router users: ASUS Adaptive QoS has a “Streaming” category — enable it and it automatically prioritises all streaming traffic across the network, including IPTV. This is the easiest QoS setup available.
If something goes wrong: If QoS causes other devices to become unusably slow (especially during streaming), the bandwidth allocation is too aggressive. Set IPTV devices to “High” rather than “Highest”, leaving some bandwidth ceiling for other devices. Most home networks don’t need extreme QoS — a balanced high-priority setting is sufficient.
Step 4 — Static IP Assignment for IPTV Devices
By default, your router assigns IP addresses dynamically — devices may get a different IP each time they reconnect. If you’ve set up QoS rules by IP address, they break when the IP changes. Static IP assignment fixes these issues permanently.
- In router admin → find DHCP or LAN → Address Reservation or Static Lease
- Find your IPTV device in the currently connected devices list
- Note its current IP address and MAC address
- Create a reservation: assign that IP permanently to that MAC address
- Save — the device will always get the same IP address
Recommended IP range for IPTV devices: Keep them in the 192.168.x.150–199 range to separate them from dynamically assigned devices and make management easier.
If something goes wrong: If a device stops connecting to the network after static IP setup, there’s likely an IP conflict — another device has the same IP. Please adjust the reserved IP to a different number within the .150–.199 range and attempt the connection once more.
Step 5 — VPN Configuration for IPTV in Australia
A VPN is not required for IPTV setup, but it has two specific use cases for Australian users:
Use case 1 — ISP throttling bypass: Some Australian ISPs throttle streaming traffic during peak hours. A VPN encrypts your traffic so the ISP can’t identify and throttle it.
Use case 2 — Accessing geo-restricted content: Some IPTV (Internet Protocol Television) streams are region-locked, meaning they restrict access based on the viewer’s geographical location, such as UK sports channels that block non-UK IPs. A UK VPN server makes your connection appear to originate from the UK.
VPN options for IPTV in Australia:
| VPN | Speed | Price | Best For |
|---|---|---|---|
| ExpressVPN | Fast | ~$10/mo | Reliable, easy setup |
| NordVPN | Fast | ~$5/mo | Good value, many AU servers |
| Surfshark | Good | ~$3/mo | Multi-device, budget option |
| Mullvad | Fast | ~$7/mo | Privacy-focused, no logs |
Setting up VPN on your IPTV device:
Fire TV Stick:
- Install your VPN provider’s Fire TV app (search in Amazon App Store — most major VPNs have one)
- Sign in, select a server location (AU server for throttling bypass; UK/US for geo-content)
- Connect — all traffic from the stick routes through the VPN
- Open your IPTV app — streams route through the VPN automatically
Android TV:
- Install VPN app from Google Play Store
- Same process as above
Router-level VPN (applies to all devices): If your router supports VPN clients (ASUS, Netgear Nighthawk, DD-WRT):
- Router admin → VPN → VPN Client
- Import your VPN provider’s config file (OpenVPN or WireGuard)
- Enable — all devices on your network route through the VPN
If something goes wrong: If a VPN makes IPTV worse (adds lag, increases buffering), you’re connecting to a VPN server that’s slower than your direct connection. Try a different server location — choose one geographically close to Australia (Singapore, Japan) for the best balance of speed and routing. If VPN always makes things worse, ISP throttling probably isn’t your problem—stop using it and look at other optimisations. Our Optimise IPTV for Australian ISPs guide covers non-VPN performance fixes.
Step 6 — Firewall and Port Settings
Most Australian home routers don’t require port forwarding for IPTV. IPTV streams are outbound connections (your device calls the server), not inbound — so no ports need to be opened.
However, some router security settings can interfere:
SPI Firewall: Stateful Packet Inspection is a security feature that monitors network traffic and can occasionally flag IPTV traffic as unusual. If you’ve exhausted all other options and IPTV still fails, temporarily disable SPI Firewall in router settings to test. If it fixes the problem, add your IPTV provider’s server IP to the firewall whitelist rather than disabling SPI entirely.
IGMP Proxy / Multicast: Some Australian IPTV services use multicast delivery. If your provider uses multicast streams (uncommon for Australian providers, more common with Fetch TV):
- Router admin → Advanced → IGMP Proxy → Enable
- This allows multicast traffic through your router
ALG (Application Layer Gateway) settings: Some routers have RTSP ALG or SIP ALG enabled that can interfere with media streams. If you’ve tried everything else, go to Router admin → Advanced → ALG and disable RTSP ALG.
If something goes wrong: If you change your firewall settings carelessly, you run a slight security risk. Always re-enable the SPI firewall after testing (use the whitelist approach rather than leaving it disabled). For a household router, briefly disabling SPI for diagnostic purposes poses a minimal, though non-negligible, security risk.
Network Settings Quick Reference
| Setting | Recommended Value | Location |
|---|---|---|
| DNS Primary | 1.1.1.1 (Cloudflare) | Router WAN settings |
| DNS Secondary | 8.8.8.8 (Google) | Router WAN settings |
| Wi-Fi band | 5 GHz for IPTV devices | Router wireless settings |
| QoS IPTV priority | High / Real-time | Router QoS settings |
| IPTV device IP | Static reservation | Router DHCP settings |
| VPN | Optional — only if throttling confirmed | VPN app on device |
| SPI Firewall | Enabled (whitelist provider IP if needed) | Router security settings |
You Are Set Up
With DNS optimised, QoS protecting your streams, static IP keeping rules stable, and VPN ready if you need it, your home network is configured to give IPTV its best possible conditions. These settings work at the infrastructure level—below the apps, below the playlists, and their effects are felt on every stream, every channel change, and every evening of viewing.
For device-specific setup on top of this network foundation, our IPTV Setup Australia hub links to every device guide.
FAQ
Q: Do I need to open any ports on my router for IPTV to work?
No — standard IPTV streams use outbound connections on common ports (80, 443, 8080) that all home routers allow by default. You only need to adjust firewall settings if you’re experiencing intermittent drops that other fixes haven’t resolved. For troubleshooting persistent connection failures, our IPTV Setup Troubleshooting guide covers firewall diagnostics in detail.
Q: Will changing my DNS (Domain Name System) to 1.1.1.1 affect other internet use in my house?
Positively — faster DNS benefits all internet use, not just IPTV. Websites load slightly faster, apps connect more quickly, and DNS lookups, which are the processes of translating domain names into IP addresses, are more reliable with Cloudflare’s infrastructure than with most Australian ISP DNS servers. There’s no downside to using 1.1.1.1 for normal household internet use.
Q: My ISP provides a locked router, and I can’t access admin settings — what can I do?
Configure network settings at the device level instead (Settings → Network → Manual DNS on each IPTV device). For QoS, consider investing in a separate router placed between your ISP modem and your home network — this technique is called a “double NAT” setup and gives you full control. Alternatively, apply a VPN (Virtual Private Network) at the device level without needing router access. Our Optimise IPTV for Australian ISPs guide has ISP-specific workarounds for locked routers.
Q: Is it legal to use a VPN with IPTV in Australia?
Using a VPN is legal in Australia. Whether the IPTV content you access via VPN is legal depends on the content and provider, not the VPN itself. A VPN is a network tool — it doesn’t change the legal status of what you watch. For a full breakdown of IPTV legality in Australia, see the Legal IPTV Australia pillar, which covers all relevant Australian law.
Wrap-Up
Network settings are the foundation your IPTV setup runs on. Faster DNS means faster channel switching. QoS means your streams win when bandwidth is contested. Static IPs mean your rules always apply to the right devices. And VPN is there if you need it for throttling or geo-access.
None of this is complicated once you know where to look. Log into your router, make the changes, and you’ll feel the difference every time you hit play.
Enjoy your setup.
Our Fact Checking Process
We prioritize accuracy and integrity in our content. Here's how we maintain high standards:
- Expert Review: All articles are reviewed by subject matter experts.
- Source Validation: Information is backed by credible, up-to-date sources.
- Transparency: We clearly cite references and disclose potential conflicts.
Our Review Board
Our content is carefully reviewed by experienced professionals to ensure accuracy and relevance.
- Qualified Experts: Each article is assessed by specialists with field-specific knowledge.
- Up-to-date Insights: We incorporate the latest research, trends, and standards.
- Commitment to Quality: Reviewers ensure clarity, correctness, and completeness.
Look for the expert-reviewed label to read content you can trust.